


Make the Niki's Butterfly knot | Tutorial
In this photo tutorial, you will see how to knot the Niki's Butterfly pattern. The Daylight knot was designed by Nicole Damer and is easy to make.
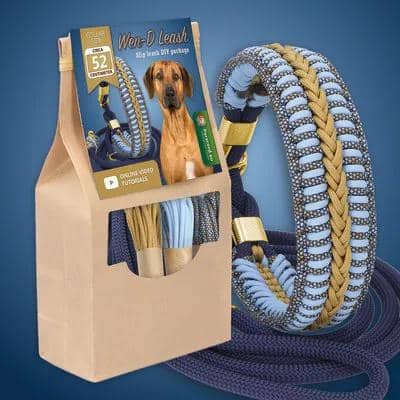
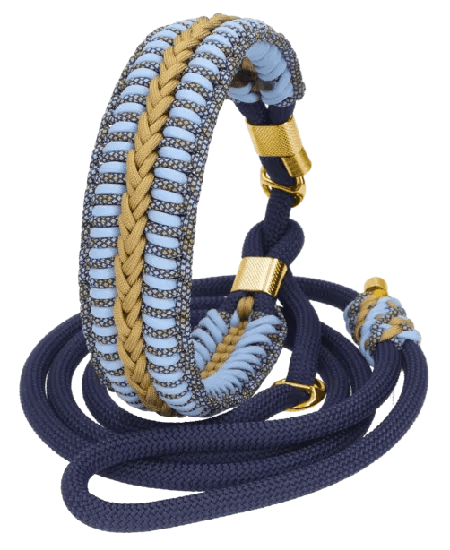
Make a beautiful double stop slip leash with the Wen-D Leash design. You use dog leash rope and paracord to make this dog leash and collar in one.
Have you bought a DIY kit to make the Wen-D Leash slip leash? Here you will find the instructions to make this leash. Of course you can also make this leash without this kit, you can find the necessary materials on the product page.
In the tutorial these tools are used:
The Wen-D Leash is designed by Wendy van der Helm. We would like to thank her for giving us permission to make the tutorial and the DIY kit.
Before you start sewing, you need to know where exactly the cord tube should be. This depends on the length of the folded part of the rope. The length calculation you can use is 'neck circumference + 2 cm'. Does your dog have a neck circumference of 47 centimetres? Then make sure that the folded part is 49 centimetres.
The cord tube is placed next to the loop, the loop and the cord tube together take up about 5 centimetres.
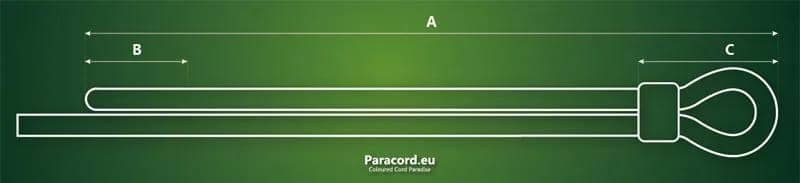
Illustration 1 - Important measurements for the leash
Please note that this is based on an end that is already ready for the end cap. Are you going to cut and heat the end of the rope later, as in the video? Then make sure you take 1-2 extra centimetres.
Now you are going to sew the dog leash rope together at the place where the cord tube is going to be. You can use nano cord for this.
Make sure that you do not sew too far, so that the sewn part still falls nicely under the cord tube. In between, check whether the cord still fits through the loop.
Now you are going to knot the collar part of the lead. You tie this with paracord type 3.
In the kit you will find 3 bundles of paracord. Cut one meter of each bundle and put it to the side. You will use these when you start making the diamond knots.
You use the rest of the paracord for knotting the collar. First you add the paracord ropes to the dog leash rope. After you have added all the colors, you are going to knot around the thick rope as shown in the video.
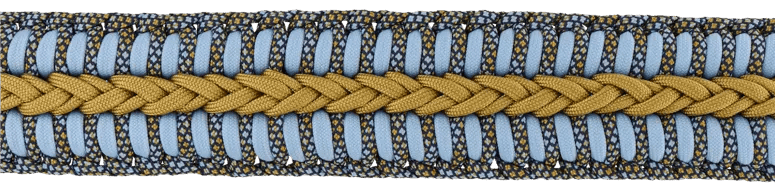
The video refers to the different colors with numbers. For the color combination in this package is color 1 North Star Diamonds Snake, color 2 Polar Blue and color 3 Pirate Gold.
In the example, we have used the Helmy's Next knot with the edge of the Sanctified Covenant knot. Because this is knotted around the thick rope, it does look quite different. A nice feature of the Wen-D Leash is that you can use a lot of different paracord knots for the collar part.
For the length of your knotwork look back at illustration 1. The length of both B and C should be 5 cm. Please note that with B the 5 cm is for a finished rope end. Do you have the end unfinished? Then take 1-2 cm extra.
The space between B and C you will fill with the paracord knotting. Is the knotted part complete? Then you are going to finish it off by backstitching the paracord strands.
Now continue making the slip leash by adding the second cord tube and the "luxe" end cap. Then add the first stop/bar ring, pull the rope through the loop and add the second stop/bar ring.
Now make a handle at the end of the leash. It is up to you how big you want the handle to be.
Would you like to add a ring to your handle, for example to hang a poop bag holder? Then add this ring before you start sewing.
To hide the stitching of the handle, we tie diamond knots around the leash. You use the paracord rope you set aside at the beginning.
In the video four diamond knots are made, but of course you are free to choose another amount.
The diamond knot is made here with 6 strands. Never made a diamond knot before? Then you can choose to use the version of the diamond knot with 4 strands. It is also useful to practice this knot first before tying it around the leash.
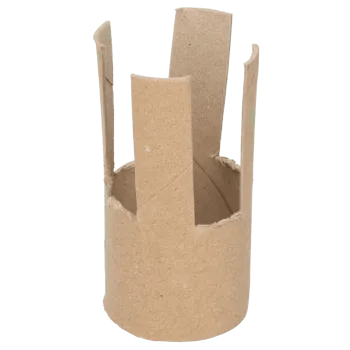
Tip: Don't have a tool at hand for the diamond knot? You can make such a tool yourself with an empty toilet roll. You cut as many parts out of the roll as the number of strands you are using. So for a four strand diamond knot, you cut four openings in the roll.
In this photo tutorial, you will see how to knot the Niki's Butterfly pattern. The Daylight knot was designed by Nicole Damer and is easy to make.
We couldn’t resist the cute bag charm trend. Make your own leather bag charm with our kangaroo or nappa leather. Follow our tutorials and create your custom key ring bag charm!
In this photo tutorial, you will see how to knot the Daylight pattern. The Daylight knot was designed by Silke Engels and is of an intermediate level.
In this photo tutorial, you will see how to knot the Cambio pattern. The Cambio knot was designed by Annet Eul and is of an intermediate level.
In this photo tutorial, you will see how to knot the Luna’s Caramella pattern. The Luna’s Caramella knot was designed by Saskia Meißner and is of intermediate level.
Want to make your own colorful dog leash from BioThane and paracord? BioThane is a strong, water-resistant and easy-to-clean material - ideal for a dog leash! In this blog, we explain step by step how to make your own leash. Using a clear pattern, you can easily determine the right size of the handle and mark the holes in the right place.